Introduction
Glenohumeral instability is often associated to anteroinferior bone defects(1) that require the use of bone provision techniques in order to restore the joint surface and arc. Different types of grafts have been used for this purpose, from autologous coracoid in the Latarjet procedure to free bone grafts. Of these, there have been descriptions of distal tibial allografts(2) and glenoid cavity (3) or femoral and humeral head allografts(4), though at present the most widely used options are iliac crest autografts and allografts.
The success of these procedures largely depends on correct positioning of the bone graft in relation to the glenoid joint surface(5). Thus, although the grafts traditionally have been fixed with metal screws(6) or reabsorbable screws or plates, double button devices have recently been introduced(7,8), seeking not only to improve positioning of the graft but also to reduce the complications associated with the other fixation systems(9). The series published in the literature report excellent outcomes in terms of graft positioning(10). The present study and accompanying video describe a glenoid cavity reconstruction technique in patients with shoulder instability using an anterior bone allograft with a double cortical button fixation system.
Surgical technique
The described surgical technique is based on the technique described by Eden and Hybinette(11,12), adapted for arthroscopic application by Scheibel(13) and subsequently modified by Taverna et al.(14).
Preparation of the graft
Firstly, in a separate surgical field, the graft is prepared and sized to 20 × 10 × 10 mm. Using a 2.8 mm drill and with the help of a guide, two orifices spaced 10 mm apart are made at 5 mm from each end, with placement of the button and suture system through them, positioning the anterior buttons in the graft.
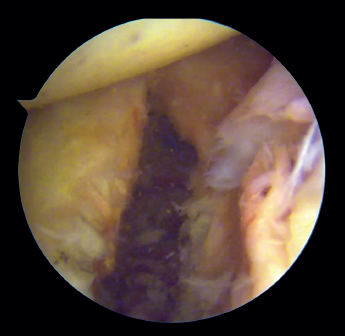
Preparation of the joint (Figure 1)
The patient is placed in lateral decubitus or beach chair position, depending on the preferences of the surgeon. A complete arthroscopic exploration is made through three standard portals, and the lesions are identified. The labrum and anterior capsule are then detached from the 2 to the 6 o'clock position, taking care to preserve their continuity. It is important to perform carefully detach labrum from the glenoid rim and remove all soft tissue until de muscle fibres of the subscapularis muscle and base of the coracoid are visualised. This will make easier the introduction of the graft and the creation of a flat bony surface to accommodate the graft.
Figure 1. View from the anterosuperior portal (left shoulder). Note the flat glenoid surface after drilling and roughening of the glenoid bed and deinsertion of the anteroinferior capsulolabral complex.

We then address the bone defect: with the glenoid defect exposed, the defect is evened, with drilling and roughening of the glenoid cavity neck until a flat and uniform surface is obtained on which to position the graft. The central point of the defect is selected for positioning of the graft, and an implant is inserted as a reference that subsequently will be used for capsulolabral repair.
Introduction of the glenoid guide and positioning of the sheaths
(Figures 2 and 3)
Figure 2. View from the anterosuperior portal (left shoulder). Note the glenoid guide positioned at the centre of the defect and drilling at its upper and lower portion, spaced 10 mm apart.

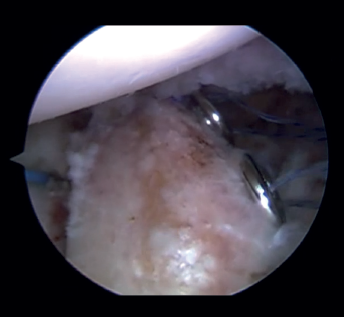
Arthroscope is introduced through the anterosuperior portal, and the glenoid guide is introduced through the posterior portal, and passed paralel to the glenoid surface until the hook is located at the centre of the bone defect. The guide is secured with two cannulas inserted through two small accessory incisions, until connecting with the posterior cortical layer. Both cortical layers are drilled through them using a 2.8 mm drill fitted with a sheath so that on withdrawing the drill the sheath is positioned at drilling level. This step is made twice to introduce two sheaths: one above and the other below the glenoid guide hook and spaced 10 mm apart. Through these sheaths we advance two monofilament loops that are retrieved sequentially through the anterior portal for subsequent passing of the graft. At this point we can remove both sheaths and the glenoid guide, taking care to prevent the guide hook from coming into contact with the glenoid surface in order to avoid damaging to the cartilage.
Figure 3. View from the anterosuperior portal (left shoulder). Monofilaments inserted through the sheaths from posterior to anterior for subsequent passing of the threads that will introduce the graft.

Introduction and fixation of the graft (Figure 4)
The cannula is removed from the anterior portal, from the posterior viewing portal, rotator interval is widened in order to facilitate introduction of the graft. Using both monofilaments, the graft traction threads are inserted from front to back. The graft is introduced into the joint, applying traction upon the threads from the posterior position. The graft is placed in line with the defect and within the capsulolabral structures. Once the graft is positioned in its final anterior position, the posterior buttons are placed by means of the traction threads and are fixed via a self-stabilizing running suture, tightening to 100 N with the help of a tensiometre, in sequence.
Figure 4. View from the posterior portal (left shoulder). Insertion of the graft by means of the traction threads and positioning in line with the bone defect.

Capsulolabral repair (Figure 5)
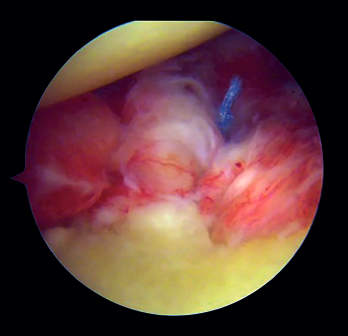
After confirming the correct position and stability of the graft, capsulolabral tissues are repaired using glenoid implants, leaving the graft extra-articular.
Figure 5. View from the posterior portal (left shoulder). Capsulolabral repair by means of glenoid implants, leaving the graft in an extra-articular position.

Postoperative management
During the postoperative period, the patients are immobilised in a sling in 15° abduction for four weeks after the operation. At this point passive mobilisation can begin. From week 6, active mobilisation can be allowed, and after 12 weeks scapular girdle strengthening exercises are started. Contact sports are not allowed until 6 months after surgery.
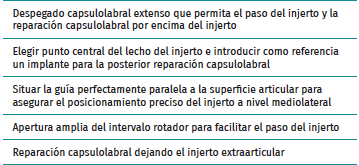
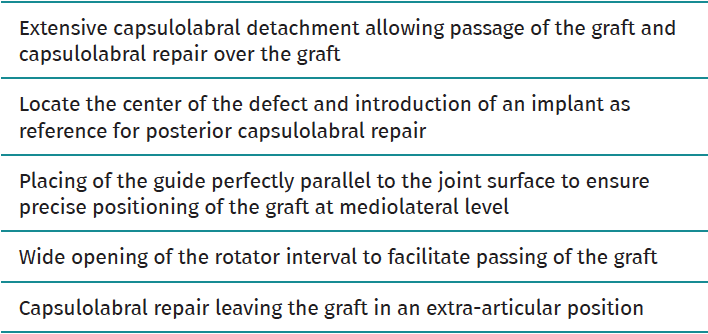
Table 1 summarises the key points of the procedure.
Table 1. Key points of the procedure
Discussion
The restoration of the glenoid joint surface in patients with anterior glenohumeral instability and bone defects is a challenge. In patients with major glenoid bone defects, many authors consider the Latarjet as the gold standard treatment, with many studies evidencing satisfactory short- and long-term outcomes(15,16). However, this is a non-anatomical technique with a relatively high incidence of complications, also, the treatment after its failure is difficult(17). The arthroscopic bone block procedure allows us to restore stability and at the same time preserve the integrity of the tendon of the subscapularis muscle(13), and has fewer complications than the Latarjet procedure(17). Although this procedure does not reproduce the triple block effect produced by the Latarjet technique, this might not be necessary in patients with less significant bone defects and repairable soft tissues(7). These are in fact the patients of our study: patients with glenoid bone defects of over 5% but under 20%, and with good soft tissue conditions in which soft tissue repair alone might not be enough to avoid recurrences, but with bone defects of insufficient relevance to indicate a Latarjet technique. Stability is restored with a lesser incidence of complications, moreover, Latarjet procedure may still be an option if this procedure fails.
This procedure has been described for an arthroscopic approach. Its relatively recent adaptation implies that few studies analysing its outcomes are available. In addition, different modifications of the technique are being introduced. One of them is the use of cortical double button devices for fixing the graft. These devices are considered to allow a more precise positioning of the graft, resulting in greater appositioning, contact and integration of the latter(7). Key elements in this regard include the accompanying guides that help to position the graft centred with respect to the bone defect and in line with the glenoid joint surface(18). In addition, the use of tensiometres allows compression and stable fixation of the grafts(18). These elements moreover have been associated with fewer neurological complications and material irritation phenomena traditionally related to screws, oblying to its removal(9,19). None of the published series that use this fixation system reflect postoperative complications related to these devices(7,20), in contrast to the use of screws, where the complications rate reaches 6.5% according to Butt(9). On the other hand, the results obtained in terms of positioning are good with this procedure, as evidenced by Taverna et al.(7) and Boileau et al.(8), who achieved precise positionings in the craniocaudal axis in 92.3% and 100% of the patients respectively, with precise axial positions in all of the cases in both series. It should be noted that both authors also used the double button device with the posterior guide.
Conclusions
The described technique for arthroscopic repair of anterior glenohumeral instability using a cortical double button fixation system with posterior guide is both reproducible and precise in positioning the bone graft.
Supplementary material (Video 1)
Video 1. Anterior arthroscopic bone block with double cortical button fixation system and posterior guide for anterior shoulder instability with glenoid defect. Surgical technique.