Introduction
The decision to provide surgical treatment for patients with anterior glenohumeral instability has classically been reserved for those individuals with recurrent instability. However, the indication is changing in favour of surgical stabilisation after a first episode in patients with hyperlaxity and in young people involved in contact or competitive sports(1). In deciding the surgical approach, it is crucial to consider the percentage bone loss of the glenoid and proximal humerus. The Sugaya perfect circle technique is used to calculate the percentage of glenoid bone loss(1).
Due to the high frequency of concomitant glenoid and humeral head injuries, calculation of the glenoid contact area in relation to the humeral head, or glenoid track, was developed. This term, originally investigated by Yamamoto, analyses the area of contact between the humeral head and the glenoid in relation to bony injuries resulting from glenohumeral dislocation. In an anatomical study, he determined that the glenoid track in an uninjured shoulder corresponds to 84% of the glenoid width.
This figure was later modified to 83% in another study by Omori and published by Di Giacomo(2,3). Its calculation aims to assess the risk of Hill-Sachs lesion engagement with the anterior margin of the glenoid in the position of maximum abduction and external rotation of the shoulder(4). Knowledge of this parameter will help us in deciding the best surgical approach in each case. Thus, when the Hill-Sachs lesion interval is greater than the glenoid track value, it is considered to be an off-track lesion, indicating an increased risk of humeral head engagement. On the other hand, when the interval is smaller than the glenoid track value, it is referred to as an on-track lesion, and engagement in this case is very unlikely(5).
Although there is debate about the percentage of glenoid loss in decision making, it is considered appropriate to combine remplissage with the arthroscopic Bankart procedure in off-track lesions with losses < 25%(6). According to De Froda, for glenoid bone losses < 13.5%, a Bankart repair can be chosen in the presence of on-track lesions, and a remplissage procedure can be added if the lesions are off-track. It is therefore important in all cases to make a correct assessment of the bone lesions and their potential engagement or off-track effect. On the other hand, in the presence of glenoid losses > 17.3%, glenoid bone reconstruction is indicated(7).
Among the therapeutic options, the technique described by Michel Latarjet is widely known, though the current tendency is to increasingly use iliac crest autograft and allograft techniques(8). These free bone graft procedures are more anatomical alternatives, and their short-term results are promising(9).
This study presents an arthroscopic technique involving the combination of both procedures: bone block grafting and remplissage.
Presentation of the technique
Indications
Anterior glenohumeral shoulder instability is frequently associated with bipolar off-track bone lesions with glenoid loss > 17.3%, with treatment being based on glenoid reconstruction techniques. However, these procedures alone do not resolve bone loss of the proximal humerus. This posterior humeral head defect or Hill-Sachs lesion leads to increased recurrence of anterior glenohumeral instability. As treatment, the arthroscopic remplissage technique, described by Wolf and Pollack, involves advancing the infraspinatus tendon and posterior capsule to the bony defect of the humeral head using bone anchorings(10). As a result, the engagement effect disappears and dislocation is prevented(11). It is thus reasonable to postulate that the combination of a bone block procedure and a remplissage technique will offer better outcomes in these patients than each procedure separately, or in comparison to isolated Latarjet surgery(12).
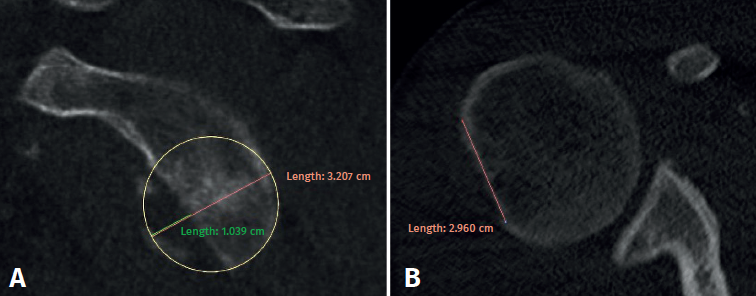
Image assessment
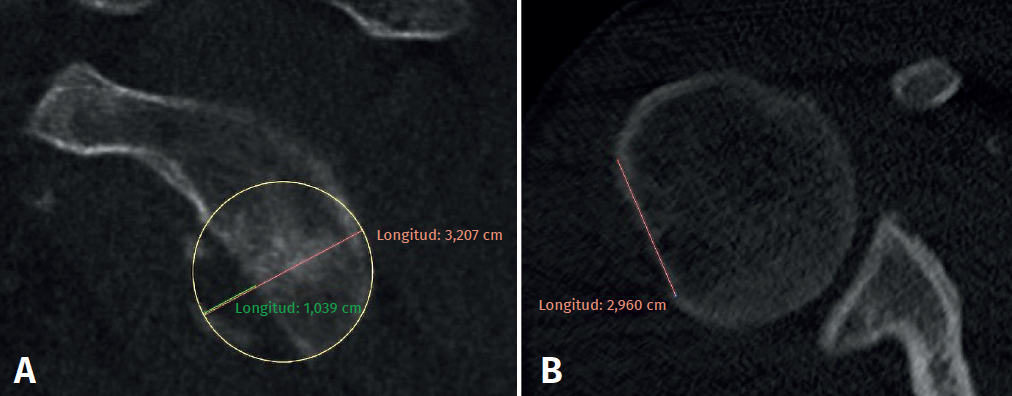
Computed arthrography (CT-arthrography) or magnetic resonance imaging (MRI) is used to determine the glenoid track in all cases. To measure the defects we use the tools provided by PACS (Picture Archiving and Communication System). To assess glenoid lesions, we must select the sagittal section where the defect is largest (generally the most superficial section). Similarly, to determine the Hill-Sachs interval, we use the axial view showing the greatest extension of the mentioned interval(13). The formula proposed by Di Giacomo is applied, and we determine the engaging or non-engaging nature of the lesions (Figure 1).
Surgical technique
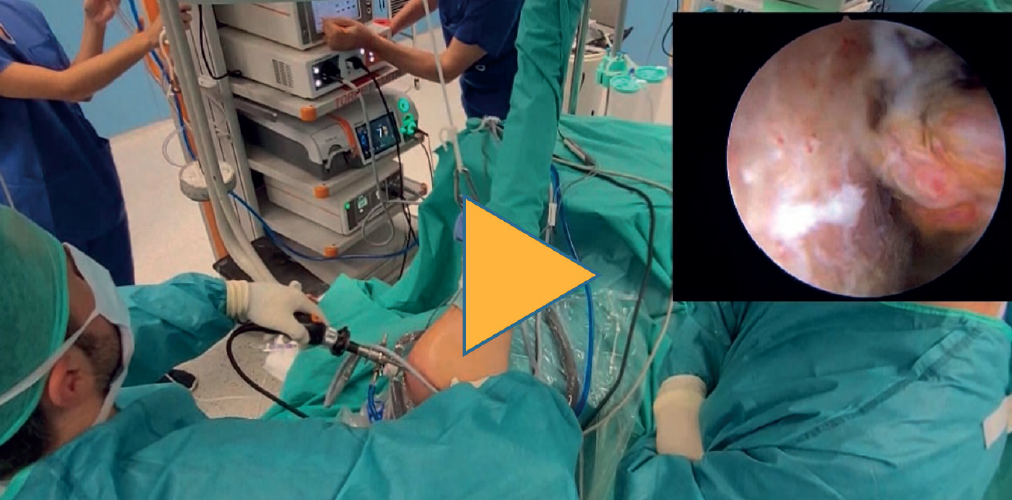
The procedure is carried out by combining two known techniques: the remplissage technique described by Wolf(10) and the bone block technique described by Taverna(14). We develop this in four steps (Video 1).
First step: harvesting of the graft
This is done with the patient in the supine position under general anaesthesia and interscalene block. A 3-cm approach is made over the anterosuperior iliac spine, and a graft measuring approximately 28 × 20 mm is obtained with the aid of an oscillating saw, adapting the amount to the size of the bone defect. However, a size of 20 × 10 × 10 mm is described as adequate(8). The wound is closed and the sterile fields are removed.
Second step: remplissage and graft preparation
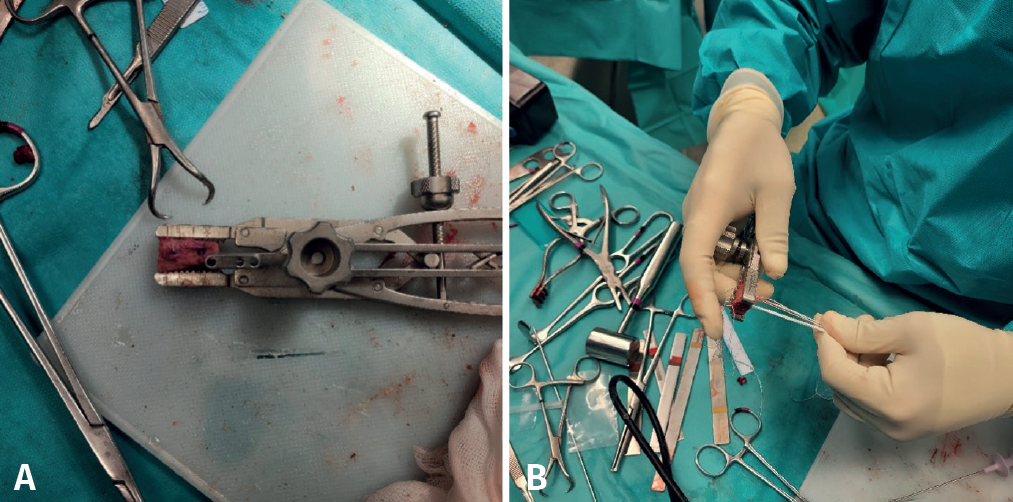
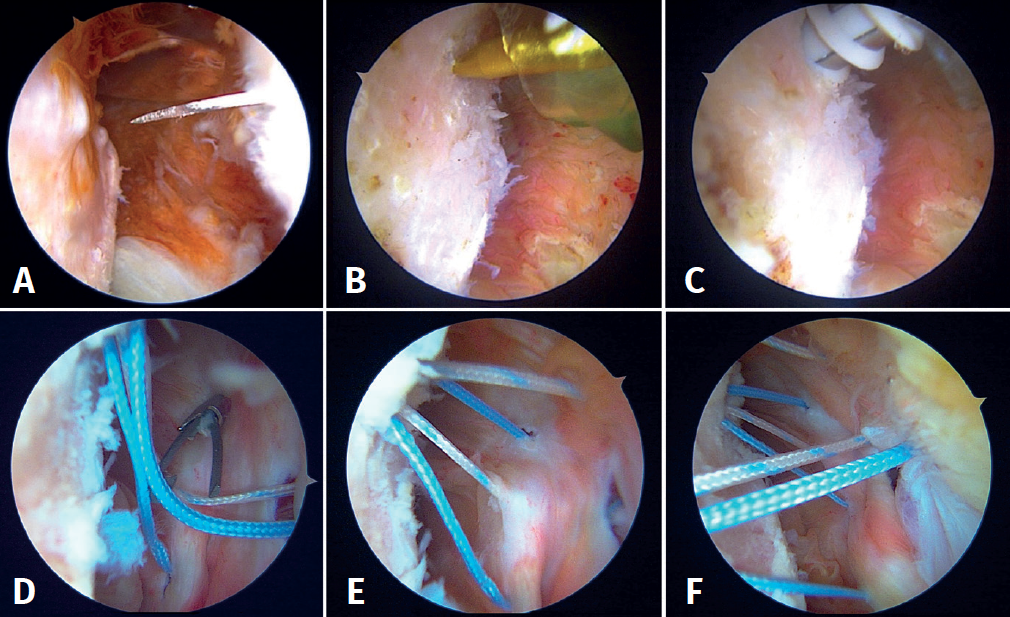
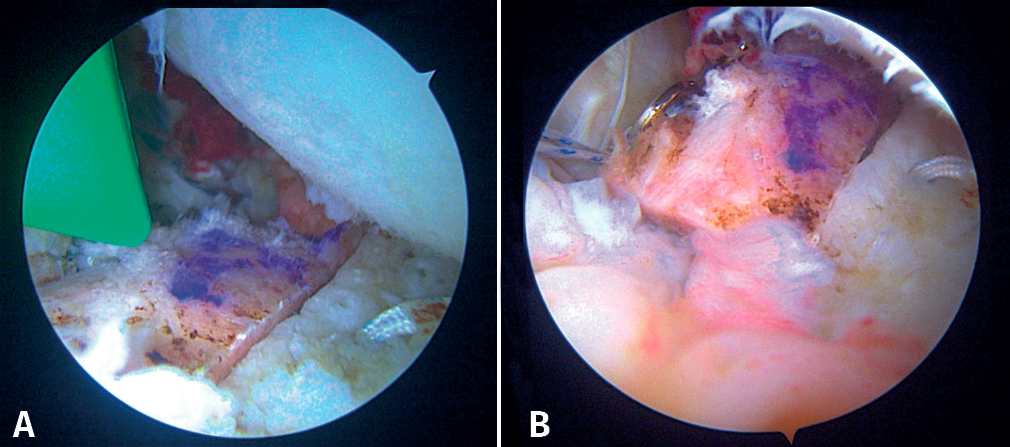
The patient is repositioned in lateral decubitus. Before placing the fields, a physical examination is performed to check glenohumeral instability with the modified anterior and posterior drawer tests(15). The humeral head is shown to engage in the glenoid with the arm in abduction and external rotation(6)(Video 1). Longitudinal traction is applied to the limb to be operated upon, according to the standard arthroscopy procedure. Arthroscopy is started through the posterior portal. An initial assessment of the location and extent of the lesions is made (Figure 2); the anterior portal is established under direct vision with the aid of a needle, 1-2 cm inferomedial to the anterolateral corner of the acromion, to penetrate within the rotator interval. An anterosuperior portal and a posteroinferior auxiliary portal are also established using an outside-in technique 2-3 cm below the posterior portal(16).

First, the glenoid is debrided with the aid of a shaver-type motor, and free bodies and bony debris are removed. The labrum and capsule are detached together from the glenoid margin, creating a wide recess to accommodate the graft, and the surface is prepared by creating bleeding edges with a burr. Then, using a posteroinferior auxiliary portal established under direct vision (Figure 3A), remplissage is started with debridement of the Hill-Sachs lesion and the placement of two bone implants - in this case HealicoilRegenesorb® (Smith & Nephew Inc., Andover, MA, USA) 4.5 mm double suture Ultrabraid® N.2 (Smith & Nephew Inc., Andover, MA, USA ) (Figures 3B and 3C). The 8 extremities are retrieved, passing them through the capsule approximately 1 cm apart and using a Sling-Shot® device (Stryker) (Figures 3D, 3E and 3F). The extremities are left untied in the posterior portal.
During this time, a second surgeon prepares the graft, giving it a rectangular shape and a size of 20 × 10 × 10 mm. To do so, he/she uses the instruments of the Glenoid Bone Loss® system (Smith & Nephew), drilling two holes with a 2.8 mm drill and spaced 10 mm apart, assisted by the specific graft preparation forceps (Figure 4A).
On the preparation table, one suture of the upper loop is passed through the upper orifice of the bone block and the lower loop through the lower orifice. These two suture loops are then used to close the double EndoButton® (Smith & Nephew) and thread the implant through each orifice of the block. Tightening is applied until both buttons are seated on the free surface of the bone block (Figure 4B).

Third step: insertion and fixation of the graft. Capsulolabral reconstruction
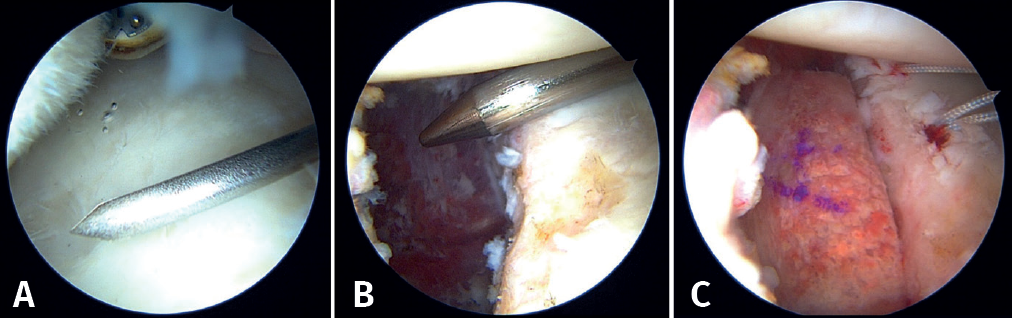
We then start the bone block technique, rearranging the posterior portal so that a Wissinger-Rod® guide (Smith & Nephew) is rested on the glenoid surface and can be directed to the centre of the glenoid defect (Figures 5A and 5B). Next, we slide a hemi-cannulated guide or Glenoid Drill Guide® (Smith & Nephew) over it, the Wissinger-Rod® is removed, and the hook-ended articular arm of the guide is passed through it. This is positioned in the centre of the glenoid defect and is assembled onto the guide handle. The two cannulas that guide the perforations are also passed through the same handle in a posterior-anterior direction, making point incisions in the skin. The assembly is adjusted and cannulated sheaths, each mounted on a specific 2.8-mm drill, are inserted through the two cannulas; drilling is made until they protrude at the anterior surface of the glenoid neck, followed by withdrawal until they are flush with the glenoid neck. A nylon loop is passed through each sheath to retrieve the sutures.
Using the anterosuperior portal for vision, two anchorings are positioned for subsequent labral reconstruction. We use Suturefix Ultra® or Suturefix Curved® implants (Smith & Nephew), one at the midpoint of the lesion and another as distal as possible; we retrieve their extremities to the posterior portal.
Then, the bone block (lower part first) is guided through the metal cannula or directly through the extended anterior approach, followed by loop suture pulling and tightening, one by one. The bone block is positioned with the help of the hook guide. Once the position is considered to be satisfactory (Figure 5C), the implant sutures are passed through two buttons posteriorly using the suture retriever. Both are then advanced anteriorly (with a slip knot and a knot pusher) until they rest on the posterior surface of the glenoid neck (Figures 6A and 6B). Then, the sutures threaded to the posterior buttons are knotted using a Nice-type knot and tightened, as indicated by the technique, using a specific tensor up to 50 N. After doing this with both sutures, they are tightened again to 100 N and three safety half knots are added.
Fourth step: capsulolabral plication and knotting of the remplissage
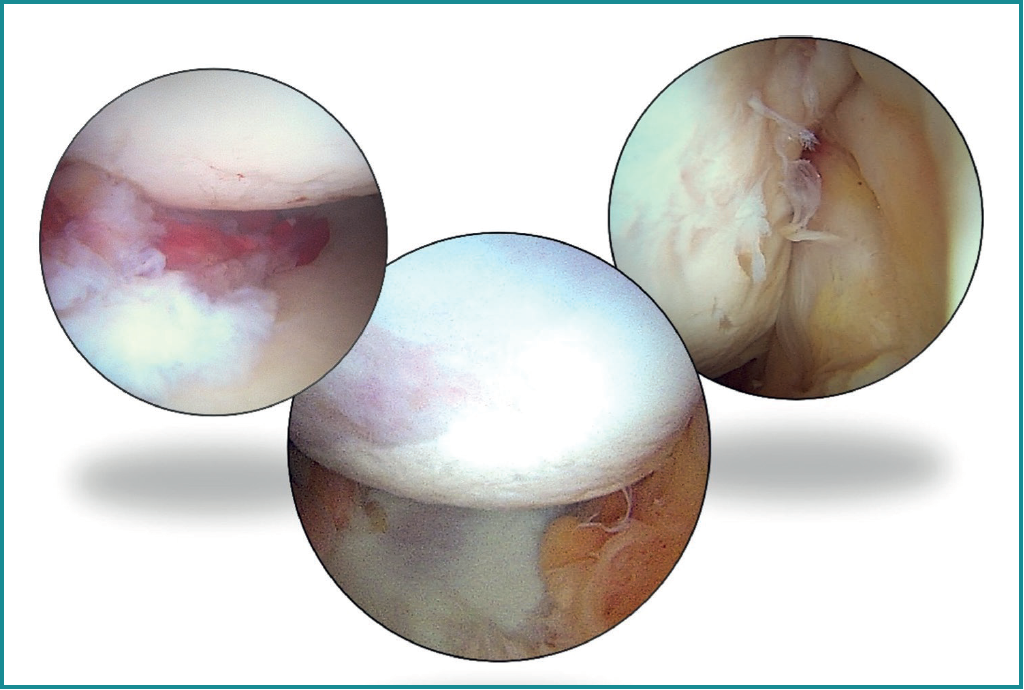
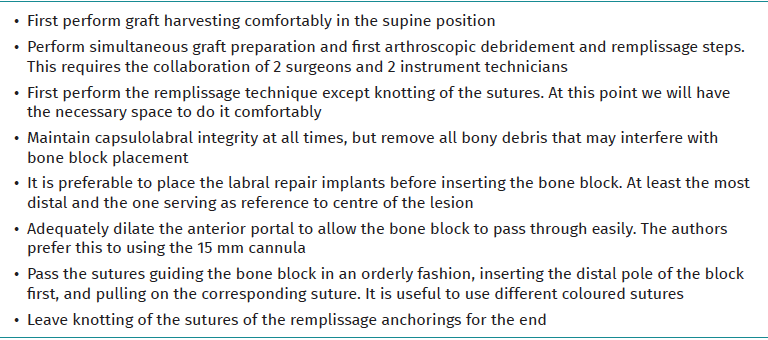
Once the bone block is secured, the sutures of the implants previously placed at the anterior margin of the glenoid lesion are retrieved, and repair is carried out of the labrum and capsule over the bone graft according to the usual technique. Finally, the suture extremities of the implants placed in the Hill-Sachs lesion are knotted from the posterior portal, reducing the defect and completing the remplissage technique(17). The result obtained is assessed (Figure 7) and the procedure is completed by suturing the portals and immobilising the limb with a standard thoracic bandage.

Postoperative protocol
The postoperative period is divided into four phases, progressing from passive to active exercises, and on to muscle strengthening.
Phase 1 comprises the first three postoperative weeks and begins with passive mobility of the scapula in conjunction with active mobility of the elbow, wrist and fingers. Patients should wear the sling at all times except during hygiene or exercise(18).
Phase 2 starts in the fourth week. The aim here is to begin active mobility of the shoulder and to abandon the use of the sling. The focus should be on stretching the posterior capsule during the first two weeks of this phase. From the sixth postoperative week, passive internal and external rotation is started according to tolerance, with the shoulder in varying degrees of abduction, while active shoulder flexion is continued up to 145°.
Phase 3 begins approximately in the tenth postoperative week. Muscle strengthening of the subscapularis, biceps brachii, pectoralis major and the rest of the muscles should be started. At the end of this phase, active flexion, passive external rotation in abduction and adequate activity of the rotator cuff muscles should be completed.
Phase 4 begins at 16 weeks, focusing on activities above head level, and ends with functionality similar to that before the injury(18,19).
Advice and tips (Table 1)
Discussion
Recurrent anterior glenohumeral instability may be associated with larger bipolar bone defects. Although a significant Hill-Sachs lesion may occur in 23.1% of the cases after a first dislocation, important glenoid bone loss is observed in only 4.4% of the cases. However, repetitive events contribute to the formation of larger defects in both structures(20).
In addition, the age of the patient at the time of first dislocation also influences the size of the bipolar defect, with larger sizes occurring in patients > 30 years of age compared to younger individuals(20).
The preoperative assessment of this bipolar bone loss is crucial in therapeutic decision making, since intraoperative assessment to estimate glenoid bone loss may not always be accurate(21). The systematic use of radiological picture archiving and communication system (better known as PACS) tools is recommended for the assessment of these lesions. Accordingly, Shin et al. defined critical percentage glenoid bone loss as 17.3%, beyond which a procedure with reconstruction of the bone defect should be indicated(22). In their work, De Froda et al. established that arthroscopic repair is reliable in the presence of glenoid bone loss < 13.5% and, in agreement with Shin, they advise reconstruction of the bone defect in losses of over 17.3%. In addition, De Froda et al. defined what may be called a "grey" zone between 13.5% and 17.3%, where the decision should be individualised in each case. In sum, when glenoid bone loss > 17.3%, reconstruction of the glenoid bone defect would be indicated and, in cases where loss > 13.5% but < 17.3%, the activity level, expectations and goals of the patient should be taken into account in deciding between glenoid reconstruction versusarthroscopic Bankart repair(6,7).
According to Moroder, there are no clinical or radiographic differences between iliac crest bone block reconstruction techniques and Latarjet surgery in patients with anterior glenohumeral instability and bipolar bone loss(23). Posteriorly, Callegari, using models with bipolar bone loss, demonstrated that both procedures result in comparable biomechanical and clinical results. This suggests that both options may be equally effective in this group of patients(9). However, a cadaver study showed that when the humeral head defect exceeds 31%, the Latarjet technique fails to prevent dislocation. This suggests that, in injuries of this magnitude, it may also be necessary to correct the humeral head defect, such as with remplissage(24). According to studies in models such as those of Callegari, the addition of the latter technique to a bone block procedure results in greater resistance to anterior translation and greater force is required to cause dislocation compared to Latarjet surgery and a bone block procedure alone. Its addition should, in theory, reduce the risk of recurrence of instability and therefore justifies the use of the technique described in this article(9). Furthermore, although additional treatment of the humeral head defect during a Latarjet procedure is considered unnecessary, since it theoretically eliminates the engagement effect, it has been seen that this does not occur in 11.8% of the cases. This could be a cause of relapse even in the first two postoperative years(25).
Another reason why it is advisable to use a bone block technique compared to arthroscopic Latarjet is that it is technically less demanding. Furthermore, the latter is limited by the anatomy of the coracoid process, and its precise measurement for use as a graft can be arthroscopically complicated, unlike in bone block surgery, where harvesting and measurement can be done accurately(9).
Lastly, the main advantage of the described technique is that it allows the Hill-Sachs defect, the labral lesion and glenoid reconstruction to be addressed arthroscopically in the same surgical step. The combination of these procedures has been reported to improve shoulder stability, especially in the presence of significant bipolar defects(26). In addition, the graft can be precisely measured and accurately modified(9).
Conclusions
Because of the reported advantages of arthroscopic bone block procedures and the need for humeral head augmentation in large off-track type bipolar defects, this surgical technique is presented with the aim of enabling its replication. It is expected that this technique may potentially involve fewer complications compared to non-anatomical techniques.
Supplementary material
The video of the technique accompanying this article can be seen at (Video 1):